Horsehair Lines
THE Traditional Tenkara Lines
Horsehair lines are the "traditional" tenkara lines. Not nylon, not kevlar, not furled. Horsehair was used as tenkara line for hundreds of years before nylon or kevlar were even invented. The first written account of fly fishing anywhere in the world indicated the line used was horsehair. It has been used as fishing line for thousands of years in various cultures. In some ways it is still the best material. I suspect many people may question that view, but I bet most of them have never fished with it!
Horsehair seems to have just the right combination of density and stiffness to make a wonderful tenkara line. By tying together segments made from different numbers of hairs, you can make a line as long as you want and with any taper you want. With modern graphite tenkara rods, you can cast a surprisingly light horsehair line.
The only source I've seen that reported the number of hairs used to make a tenkara line in Japan indicated a line of five segments, with 5 hairs in the first segment, 6 hairs in the second, and then 7, 8, and 9 hairs in subsequent segments. A line like that would actually work very nicely with the Daiwa Keiryu-X 30, which has been disparaged by some as not being a true tenkara rod. (But if it casts the traditional horsehair line well - and it does - it is probably closer to the traditional tenkara rods than are the modern big name rods of today). For most tenkara rods, I generally start with 3 hairs at the tippet end and do not exceed 5 at the rod end.
Horsehair lines even heavier than the traditional Japanese lines are used to this very day by anglers in northern Italy who use a technique called "la pesca a mosca Valsesiana." The Valsesian rods are similar to tenkara rods, although based on the line they use, I suspect they are a bit stiffer. The line used in Italy was described by Yvon Chouinard, the founder of Patagonia, in a wonderful article entitled "Simple Gifts" which was in the October 2009 issue of Fly Rod & Reel magazine. Mr. Chouinard described the line as tapering from 14 or 16 hairs at the rod end down to 3 at the tippet end.
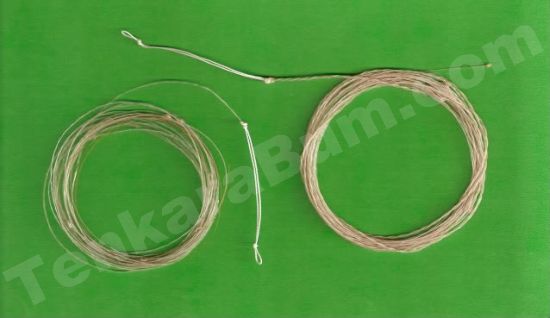 The line on the left is made to Charles Cotton's specifications. The line on the right is made to Yvon Chouinard's descripton.
Compare that to the line that Charles Cotton specified in The Compleat Angler. He indicated that the first two lengths nearest the hook should be of two hairs, the next three lengths of three hairs, the next three after that of four hairs, then 5, 6, and 7 hairs up to the length required for the rod. They used longer rods, and longer lines than are generally used with tenkara rods.
For modern tenkara rods such as the Suntech TenkaraBum 36 and 40 or the Daiwa, Nissin or Shimano rods, you only have to go up to four hairs. For a Suntech Kurenai, I wouldn't go over 3 hairs! The full length of the line that Cotton described (up to three lengths of 7 hairs) is 34 feet long. For tenkara rods, going up to three lengths of four hairs can create an incredibly light line up to about 16 feet long. Even that is longer than I use. I make my own "Charles Cotton" lines about 13 to 14' by ending the taper at 4 hairs.
Most modern anglers believe that Charles Cotton only dapped, and required a breeze from behind in order to blow his line out in front of him. I am certain that view is incorrect, and that he could cast his line and fly very much like tenkara anglers do today.
It is true that he could not have cast a line that light into the wind, but on a still day he could have cast anywhere he wanted.
When describing the line, he wrote that you can "cast your fly to any certain place, to which the hand and eye shall direct it" and also that it will fall "with much less weight and violence, that would otherwise circle the water, and fright away the fish."
You definitely do not want to fright away the fish!
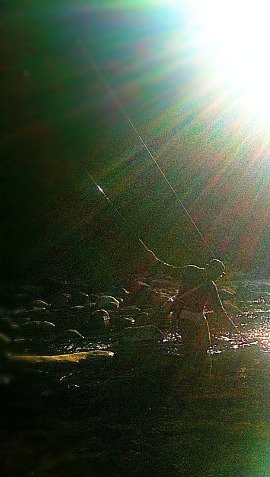 Fishing with Charles Cotton's line
Having fished with horsehair lines made to his specifications, I will attest that Cotton's line does fall very softly, and the delicacy of the presentation you can get with a light horsehair line is hard to match with a modern line. Charles Cotton's lines are so light, though, that not even all tenkara rods cast them well. They cast well with the Daiwa Expert LL tenkara rods and the Nissin 6:4 tenkara rods (5:5 for the Air Stage Fujiryu) and of course, the TenkaraBum 36 and 40.
Although I have not yet tried one on longer keiryu rods like the Suntech Keiryu Sawanobori 53, I am sure they would do well with it. Cotton's lines are quite a bit too light for the Daiwa Keiryu-X and the Suntech Genryuko. That's just as well because those rods really aren't soft enough to protect a two-hair line anyway.
The line described by Yvon Chouinard, on the other hand, cuts through the wind just as he says in the article but I find it a bit heavy for most tenkara rods. It casts like a bullet with the Keiryu-X, though! For fishing in the wind, or casting four flies as in pesca a mosca Valsesiana, it actually works quite well with the big water / big fish Daiwa Expert LT H44 (discontinued). By varying the number of hairs in each segment, it is possible to make a line for any tenkara rod - from the softest all the way up to the stiffest.
The only problem with horsehair is that it just isn't very strong. Henry Wade (Halcyon: Or, Rod Fishing with Fly Minnow and Worm - 1861) wrote of fishing with a tippet of a single hair and Charles Cotton recommended two, writing "he who cannot kill a trout of twenty inches with a line of two hairs does not deserve the name of angler." I guess that leaves me out.
If you fish that fine you are likely to have fish break off. Remember, though, that they were writing about the tippet. If you use a nylon or fluorocarbon tippet, attached to a horsehair line starting with perhaps 3 hairs, the line will be plenty strong enough for most of the fish you are likely to catch with a tenkara rod. Your line will break, but the break almost certainly will be from a snag rather than a fish. Later in this article, I will discuss tippet strength.
Even with that limitation, I love the way horsehair casts, and I enjoy working with it to make lines. My lines aren't historically accurate - I don't whip the knot tag ends with silk thread, as David Webster instructed in The Angler and the Loop Rod. Doing it that way does look nice, but it takes three times as long to make each line. And I don't leave a "straw's breadth" of tag end exposed, as instructed in The Treatyse of Fysshynge wyth an Angle. Doing it that way lets all those tag ends catch the line, your tippet, grass, etc. I cut the tag ends short. I'm not a historian or a historical re-enactor - I just like fishing with horsehair lines.
Making a Horsehair Line
For years I offered a Horsehair Line Kit, which included a hank of horsehair and all the instructions needed to make a horsehair line. It was reasonably popular and over the years many people have purchased it and made their own lines.
I have decided to stop selling the kit and just put the instructions on the website so anyone can make a line without having to purchase a kit. You will have to purchase horsehair, and there are a number of sellers online.
Making your own line is a bit like tying your own flies. If you remember the satisfaction you felt from catching your first fish on a fly you tied yourself, you'll have that again, and more, when you catch a fish on a line you've made yourself - from scratch - using techniques that have been used for thousands of years.
No
tools are needed other than a pair of scissors, although a dubbing needle or
fly tying bodkin will help in tying the knots. You don't need a jig like you would to furl lines. You don't
need a vise like you would to tie flies. All you need is the horsehair.
A thorough search on the internet will give you several ways to make a horsehair line, from the instructions laid out in The Treatyse of Fysshynge wyth an Angle in 1496 on down. None of them are as simple and straightforward as the instructions that follow, and none include photos of each step.
You can find instructions for making a knotless
line. It is absolutely not necessary to have a knotless line. To the extent
possible, a tenkara line should be in the air, not in the water, so picking up debris
on the knots really isn’t a problem. If anything, the knots are valuable
reference points that aid you in watching for the minor hesitations or twitches
that can be the only clue to a subtle strike. Besides, if you break a section,
you only have to replace that section, not the whole line. The knots are a feature, not a bug.
Length and Taper
Before you start making your line, you must decide on the length and taper. This decision requires a bit of a compromise because a light line isn't very strong. A line strong enough land any fish you might hook is likely to be heavier than you'd want to fish.
As a reasonable minimum, I would suggest starting your line with three hairs. (Note: this is for the line itself, to which you will add a nylon or fluorocarbon tippet.) Only once have I broken a three-hair line on a fish. For an average 12’ 7:3 tenkara rod (or the 6:4 Air Stage Fujiryu), I would suggest a line consisting of six segments, with the one to at the tippet end having three hairs. The next two would be four hairs each, and the next three 5 hairs each.
The 3, 4, 4, 5, 5, 5 sequence (number of hairs per segment) will produce a line that casts like a dream but is a bit on the heavy side for the average rod. An alternative is a line that has one three-hair segment, and then becomes a level line with each segment having 4 hairs.
A softer rod, like the Nissin Pro Square 6:4 or a Suntech Kurenai, can cast a 3-hair level line. However, a level line could break in any segment, so you potentially could lose your entire line. Having a "weak link" segment will prevent that, but a 2-hair segment next to the tippet will break with every snag if you cannot reach the tippet to pull on. I would guess that even 8X tippet would be stronger than a 2-hair segment.
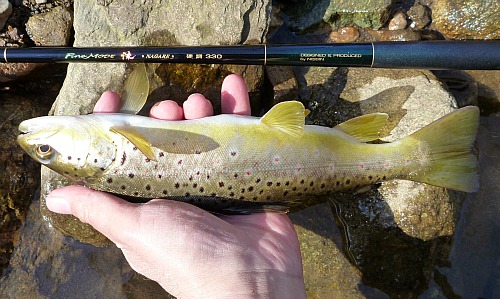
An extremely soft rod, such as the Nissin Fine Mode Nagare, can cast a lighter line yet.
The fish pictured below was caught using a 2-hair level line - with a
one hair tippet. It accounted for several fish, but I did discover that
even modest fish could hit a Killer Bugger hard enough to break a
single horsehair tippet.
For stiffer rods like the Daiwa Keiryu-X or Kiyose S-F, I’d start with 3 hairs and add one hair for each segment until you have enough segments for the length of the rod.
Modify
the taper on your next line based on how well you like the first. If people's
experience with line furling is any guide, you will not stop with one line, so
just accept that this will be a process albeit a process that should
eventually produce a line you will really like. If you have multiple rods, you are sure to make multiple lines.
Horsehair Line Step by Step
1. Before a hair is selected, you should run it between your thumb and forefinger to feel if it is smooth. Discard any hairs that are rough, any that are noticeably thicker or thinner than the others and any that do not feel round. You can roll them between your thumb and finger – if one isn’t round you’ll feel it. You can often see it as well if there is light shining on it.
Press your thumb and forefinger together to create some tension on the hair as you pull it between your thumb and forefinger. If every hair breaks, you are using too much tension. If none of them break, you aren't using enough tension. If any hair is going to break, you want it to break now. Cut the hair rather than pulling it from the hank. If you pull them out, the binding that holds the hank together will loosen and they’ll start to fall out on their own.
After
you have selected three hairs, turn one end for end. Tie the ends of
all three hairs together with a simple overhand knot. Do not
pull it tight. Over-tightening any knot
will break hairs.
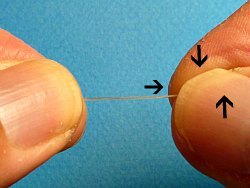
2. If you are right handed, hold the knot between your right thumb and forefinger and the three hairs together, perhaps an inch from the knot, with your left thumb and forefinger. To twist the bundle of hairs, rub your right thumb and forefinger together (in the direction shown by the arrows - thumb upwards, forefinger downwards). Dampen your fingertips if they just slide without twisting the hair.
At the same time, pull the hairs through your left thumb and forefinger. How far you pull depends a bit on how much you twist, but use this as a guide: If you start twisting with your fingertip at your thumb tip and end with it at the base of your thumb, pull about 2” of hair from your left hand while you twist. The hairs between your two hands will now look a bit like a 3-ply rope, although the twist won't be that tight.
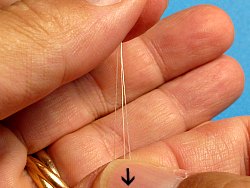
3. As you twist and pull with your right hand, the three hairs beyond your left hand will each turn individually. It is critical that they be able to turn freely, as it is this turn (twist) of each hair that keeps the three together to make a single line.
They will try to tangle up, so after each twist and pull
with your right hand, continue to hold the bundle with your left thumb and
forefinger, as shown in the photo to the right, while using your right thumb
and forefinger to slide down the loose hairs and gently separate them. Do this carefully
because if they get caught and a hair gets kinked, it will probably break. After
separating the individual hairs, repeat step 2.
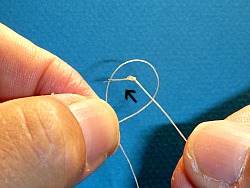
4. Repeat
the twisting and pulling until you get almost to the end of the strands. When
there is about an inch left, tie an overhand knot in the end
of the bundle to keep the strands from untwisting.
The line segment you have just made is called a "snood." (Don't ask why. I don't know why a horse is called a "horse," either.) Repeat the process, and for each new snood, turn half the hairs end for end so that the slight taper in each individual hair is offset by the ones that are turned.
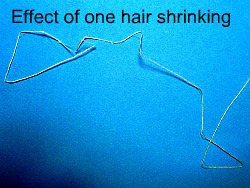
After finishing each snood and before starting on the next, I put the newly tied snood in a shallow pan of water. When you have finished the next snood and are ready to put it in the pan, take out the previous one. Occasionally one of the hairs will shrink to the point that you have to discard the snood. Although you can cut off one of the end knots, dry the hair and re-twist, I generally just start over. Life is short and hair is cheap.
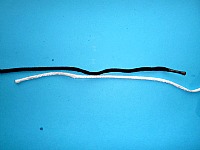
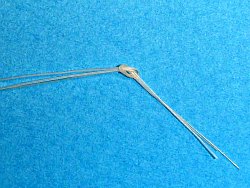
5. When you have two snoods that have successfully passed the soaking test, tie them together, wetting the knot liberally with saliva before tightening it. The knot I use is variously called the double surgeons knot, the water knot and the angler’s knot.
Unfortunately, other knots are also known by those names. Whatever it is called, to tie the knot I use, overlap the ends of the two snoods by about 3” and tie a simple overhand knot with both snoods at once but pass the ends through the loop twice. It should look like the photo below right, or at least it would if you were joining a black snood to a white one. By the way, I recommend using only white horsehair. I once made a line with brown hair and it was absolutely impossible to see when casting and fishing. The white hair is visible.
Most of the European literature specified white hair. The Treatysse recommended dying the hair to match the color of the water you planned to fish. Japanese horsehair tenkara lines are almost always tied with black hair. I suspect that historically, nearly all Japanese horses had black tails. Now I suspect it is a matter of tradition rather than practicality. Japanese violinists use white hair in their violin bows, so white hair clearly is available.
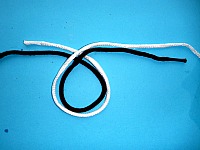
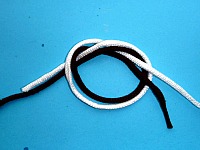
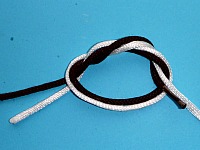
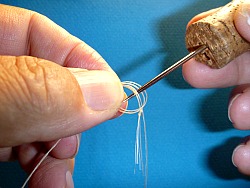
6. I find it easier to pull the ends through the loop by using a dubbing needle. Do not forget to wet the knot before tightening. After you have tightened the knot just past snug, roll the knot between your thumb and forefinger to smooth it out. Then gently pull each of the four line segments coming out of the knot to make sure all are snug. Do not pull too hard to tighten the knot. You can break hairs if you pull to hard. The surface of the hair is just rough enough that the knots tend to hold pretty well.
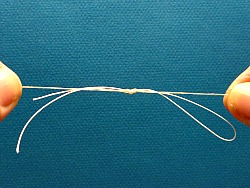
7. After you have finished the last snood (at the rod end of the line), tie a loop of braided fly line backing onto the line with the same knot used to join the snoods. Clip the tag ends.
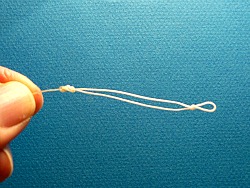
8. After the tag ends have been cut, tie an overhand knot near the end of the loop. This will give you a bit of line to hold onto and pull with when removing the line from the rod. The line is attached to the rod with a girth hitch.
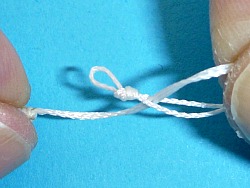
9. To tie a girth hitch, fold the loop back on itself so that the it is caught in the “V” created by the overhand knot.
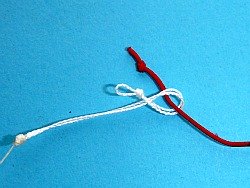
10. At the end of your tenkara rod is the lillian, which is a short piece of hollow braid. Your rod may have come with an overhand knot tied in the end of the lillian, but if it didn’t, tie one in it now. The lillian is inserted into the small loop created by the girth hitch.
The girth hitch is
tightened around the lillian and then slid up tight against the overhand knot. Make absolutely sure that you do not put any
sideways pressure on the rod tip when attaching or removing the line. When only the rod tip is peeking out from the grip section, the slightest sideways pressure will break it.
To finish the tippet end of the line, I generally tie on a 3-4" length of about 0X or 2X tippet material. (double surgeon's knot, flexible glue and clipped tag ends.) Tie a small perfection loop or other loop knot of your choice or attach a tippet ring to the end of the 0X or 2X. If you are planning to use horsehair tippets, you can tie a double surgeon’s loop in the end of the horsehair line, and in the end of your tippet, and use a loop to loop connection.
Fishing a Horsehair Line
Perhaps the first thing you will notice when you take your new
horsehair line to the stream is that it will have horrendous memory. It will not
want to straighten out. Do not stretch the line like you would nylon mono or
fluorocarbon. That will only break the line (and it will not get rid of the
memory). All you have to do is get the line thoroughly wet and the memory will
relax on its own.
Much as I have come to like the Fuji EZ Keepers, EZ Keepers and
horsehair do not play well together. You will get a kink in the line every
place it turns around the EZ Keeper. I do
not recommend using EZ Keepers. And definitely do not allow the line to dry while wrapped around EZ Keepers.
When you get snags, if at all possible get to a spot where you can
pull on the tippet rather than the line or pulling straight back on the rod. If
you use 5X tippet you can expect the line to break before your tippet does.
With 6X, the tippet might break first, but it might also stretch the line to
the point that you have little half moons of line sticking out. The half moons result because different hairs will have different stretch and recovery characteristics. I usually fish
with 6X and just assume I’ll have to repair lines, but it might be better to
fish with 7X (which is why I carried a nice 7X tippet from Varivas).
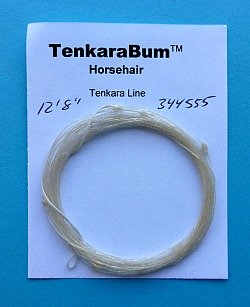 Horsehair Tenkara Line
When you get home after a day of fishing, allow the line to air dry. If you seal it in a zip lock envelope with a slip of paper inside telling you length, taper, etc, the line may be fine (the hair is pretty rot resistant) but the paper will mildew badly. To be safe, don’t seal the envelope until the next day.
Horsehair Line Repair
Eventually, you are likely to break the line (more likely on a snag than on a fish). Luckily, repairing a line is really pretty simple. Cut the broken hairs right next to the knot connecting the broken snood to the next intact snood. Be sure to leave the knot on the intact snood. Make replacement snoods following the instructions above. Tie the replacement snood to the intact one, and trim the tag ends as before. You will lose at least an inch in overall length with each repair.
The only breaks I have gotten have been in the last snood next to the tippet, which had the fewest hairs. I would suggest tying a couple extra of the lightest weight snoods for on-stream repairs.
If all that sounds like horsehair lines are delicate and should be in a display case rather than on the end of your rod, all I can say is that I really like the way horsehair lines cast, and even after many attempts, I have not been able to duplicate it with a furled line of any other material. To me it's worth it.
Horsehair Tippets
This is where you cross the line from practicality to obsession. (I crossed it long ago. Welcome.) One can argue that horsehair lines cast so well that they really do perform better than mono or even fluorocarbon lines. It is hard to argue that a tippet of a single horsehair performs better than commercial tippet, though. It is considerably weaker and considerably thicker. I am pretty sure you will hook more fish with a 5x nylon tippet. I am absolutely sure you’ll land more of the fish you hook if you use regular tippet.
About the only things you can say in favor of the horsehair tippet are: (1) your rod will never break because you hook an unexpectedly large fish, (2) a line that tapers from 4 or 5 hairs down through three, then two and finally to a single hair turns over wonderfully, (3) landing even modest fish becomes a challenge, (4) it will quickly correct any tendency you may have to strike too hard and (5) your tippets are completely biodegradable.
You might want to tie simple flies, though.
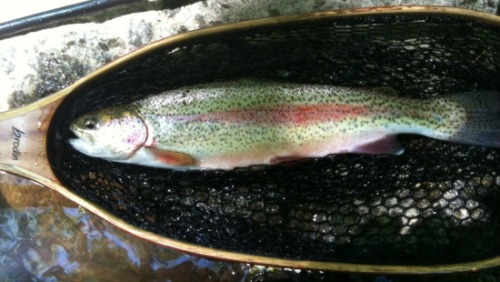
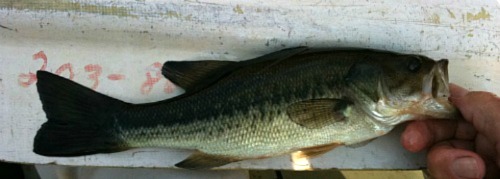
I have managed to catch reasonably good sized fish with single-horsehair tippets, notably the 12 inch rainbow and probably 10 inch bass pictured below. Of course, I have also had smaller fish break a two-hair tippet (one in heavy current and one on an overly aggressive hook set).
I would suggest making the “tippet” in two sections, with one of two hairs and one of a single hair. To make the two-hair section, select two hairs that are smooth and do not have one end substantially thicker than the other. Tie the two together with an overhand knot.
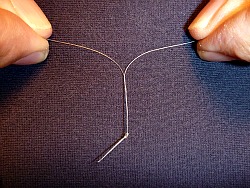
Grasp the
individual hairs as shown in the photo to the right. With one hand, twist the
hair in a clockwise direction and with the other hand in a counter-
clockwise
direction. As you twist, move your hands closer together so the hairs can twist
around each other. Reposition your hands after each twist. When you get to the
end, tie it off with another overhand knot. For the one-hair section, tie the
smoothest, most perfect hair you can find to the two-hair snood with a double
surgeon’s knot, glue and clip the tag ends.
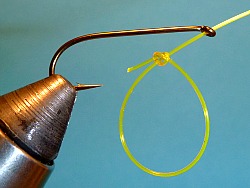
I tie the fly to the horsehair tippet with a Turle knot (not a double or improved Turle, but with Major Turle’s original). The Turle isn’t a great knot for mono or fluorocarbon, but works nicely with horsehair. The hair has a slightly rough surface so the knot won’t slip.
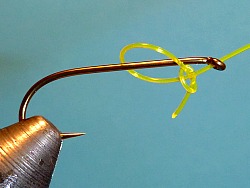
Pass the
tippet through the eye and then tie an overhand knot around the tippet. (top
photo). Pass the fly through the loop that is formed and tighten the knot
around the head of the fly, in front of the hackle and just behind the hook eye.
(bottom photo) Pull snug but do not overly tighten. Bare hook and yellow line
shown only for clarity, and yes, I had to take the hook out of the vise to get
from photo 1 to photo 2. As an aside, now you know why the Catskill-style dry flies have a very short section of bare hook between the head and the eye.
If you are beyond obsessed, you will try tying flies on hooks snelled with horsehair. That is how it was done in the old days before hooks had eyes. It is quite doable but I find it a bit difficult. You have to coil up the free end of the hair so it is at least somewhat out of the way when you wrap your hackle and body on the fly.
It is easier if you use a vise rather than clamps, but you definitely can tie flies with nothing more than clamps and nippers.
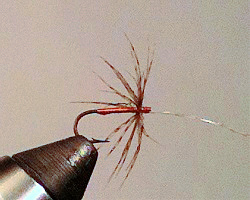 Hook eye cut off before tying.
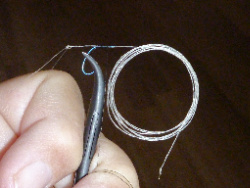 Coiled hair tippet.
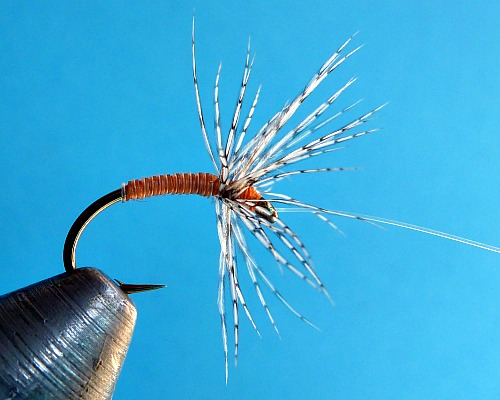
An easier way, if you use eyed hooks, is to tie in the horsehair before you wrap the body, with the hair extending over the hook bend. After wrapping the body and hackle, wrap the horsehair over the body with touching turns. Wrap past the hackle, trying not to mash any hackle fibers down. Wrap over the head and then thread the loose end of the hair through the hook eye from behind and underneath so it becomes your tippet. Put a drop of head cement on the hair right at the head to hold it in place and keep it tight.
White horsehair wrapped over the body
makes your fly bodies translucent. Liesenring wrote about the importance
of translucence in his book The Art of Tying the Wet Fly (which was reprinted with additional material written by Vernon "Pete" Hidy in The Art of Tying the Wet Fly & Fishing the Flymph).
TenkaraBum Home > Tenkara Line > Horsehair Lines
TenkaraBum Home > Hair-Brained > Horsehair Lines
“The bitterness of poor quality remains long after the sweetness of low price is forgotten” - Benjamin Franklin
"Be sure in casting, that your fly fall first into the water, for if the line fall first, it scares or frightens the fish..." -
Col. Robert Venables 1662
As age slows my pace, I will become more like the heron.
Warning:
The hooks are sharp.
The coffee's hot.
The fish are slippery when wet.
Beware of the Dogma
This Just In
TenkaraBum Traveler 27
TenkaraBum Traveler 39&44
Nissin Oni Tenkara Line
Suntech Kurenai II AR Waiting list signup -
Please indicate which length
Overall the line is very nicely put together, and the taper is well designed -- the line turns over like a rocket without being too heavy. Chris' horsehair line only needs a gentle flick to completely unroll all the way to the fly. I found roll-casting in tight spaces to be fantastically easy, and normal tenkara casting to be a real pleasure.
Laurent M, Massachusetts