Rod Care
Tenkara rod care is pretty simple, but there are a few things you should know. For some time now, I've enclosed a "Short Course on Telescopic Rods" with each first-time rod purchase. However, many people won't read an instruction sheet, and the longer it is, the fewer will read it.
My "Short Course" got too long, so I've changed it to just bullet points. Some things do need a bit of explanation, though.
The First Five Minutes
Sad but true, some rods don't last five minutes.
Don't unscrew the butt screw cap while holding the rod with the rod butt angled down. All the pieces will slide out onto the floor. If you happen to do this with a group of people, someone will step on one of the parts. Someone else will try to help and will insert at least one of the parts backwards. I won't go easily, so they'll push on it. At least one part is now broken and two or possibly three of your rod parts are now permanently jammed. Yes, I do mean PERMANENTLY. (And yes, this exact scenario actually did happen.)
Don't show your wife or fishing buddies how flexible the rod is by grabbing the tip and bending it down. That forces the rod to take an unnatural bend. Bend it too far and it will break. There is no way to know how far is too far until it is too late. It is particularly embarrassing in front of your fishing buddies that are skeptical about tenkara to begin with. Let the fish bend the rod. The rod will spread the bend over the full length of the rod, as it was designed to do. (Yeah, this happened, too.)
If you are going to tie a knot in the end of the lillian (which is not necessary if you will fish level lines), do it sitting down at a table, with the rod braced so it can't roll (happened). Don't do it with only 1" of rod tip sticking out (happened). The tip is very flexible, but can't bend around sharp corners. Any sideways bending of the tip with only an inch or two extended will break it. Either keep the tip safely within the rod, which makes tying the knot very difficult, or extend the whole tip section, and be very, very conscious of any bending. It is much safer to just not put a knot in it in the first place. Besides, level lines are lighter and you will catch more fish with them.
Attaching the Line
Put the tip plug in a safe place. Ideally, the same place every time, and in a spot where you will not be taking other things out over the course of a day. It is very easy to accidentally pull the tip out at the same time and not notice it. If you fish with a vest with a dozen pockets, make one of them the tip plug pocket and ONLY the tip plug goes into it.
When pulling the tip plug out, pull it straight out from the rod. Watch what you are doing. The tip plugs on some rods are hollow, and the lillian or one of the rod sections can get slightly stuck in the hollow and come out with the tip. If you pull the tip to the side while looking away, you can break the rod tip.
Level Line
The knot used to attach level line to the lillian is an arbor knot.
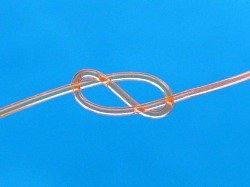 Figure 8 Knot
Start with a Figure 8 Knot in the end of the line.
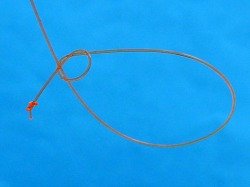 Arbor Knot
Tie an overhand knot around the line itself. This forms an arbor knot. The overhand knot is in the tag end, not in the main part of the line!
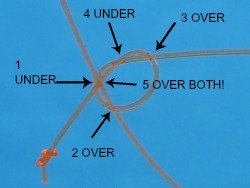 This sequence is critical
How you tie the overhand knot is critical. First, the tag end goes under the main part of the line, then back over it. Then over the other side of the loop and then under to come up through the new small loop, making the overhand knot.
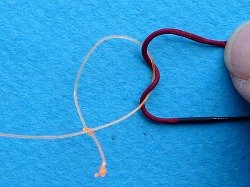 Lillian through the loop twice
Insert the lillain thrugh the loop in the arbor knot twice.
Do not concentrate on the lillian and ignore the rod tip! You must not bend the rod tip to one side when putting the lillian through the loop.
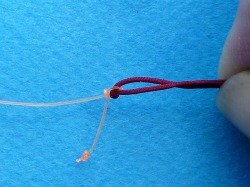 Pull the line straight out to tighten
Hold the lillian AND rod tip in one hand and pull the line straight out (in the direction the rod is pointing) with the other to tighten. Pull the knot tight.
To remove the line, again hold BOTH the lillian and the rod tip, and pull the figure 8 knot straight out (in the direction the rod is pointing. That will open the loop and allow the lillian to slip out.
If the above instructions for tying the arbor knot seem a little complex, you might find it easier to learn by watching this Animated Knots video: Arbor Knot.
Personally, though, I would do his last step (tying the overhand knot in the tag end) first - it will be much easier.
I make no attempt to keep the rod tip inside the rod, as recommended by Tenkara USA. I find that hard to do reliably, particularly with rods like the Daiwa tenkara rods that have short lillians. What I recommend, and find quite easy to do, is to have enough of the tip outside the rod that you can easily pass the lillian through the loop in the line twice.
You must pay attention to the rod tip and make sure you are not bending it to one side - even a little bit.
Then hold the end of the lillian and the end of the rod tip together between your thumb and forefinger. Then pull straight out, DIRECTLY IN LINE WITH THE ROD, not to the side, to tighten the loop. If you are holding the rod tip firmly between your thumb and forefinger, and pull straight out rather than to the side, it will not be possible to break the rod tip.
Tapered Lines
If you fish with furled lines, the Fujino nylon tapered lines, your own horsehair lines, or just tippet material for keiryu rigs, you should have a knot in the end of the lillian.
I would recommend tying the knot while sitting at a table and with the rod braced so it cannot roll. You should EITHER keep the rod tip within the grip section the whole time, which makes tying the knot quite difficult, or have the tip fully extended.
The rod tip is quite flexible, but it cannot bend around a sharp corner. If only an inch or two is out of the grip section, it takes very little sideways pressure to snap it. If it is fully extended it is more forgiving, but you must still be extremely aware and you must not bend the rod tip while tying the knot.
As with the attaching level lines, fold back the lillian and hold the rod tip, and pull the line straight in line with the rod to tighten the girth hitch. If you pull to the side and do not support the rod tip, the tip could break.
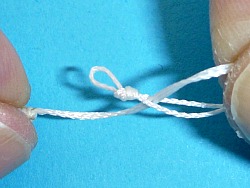 Fold loop back on itself
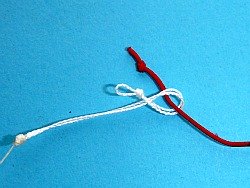 Insert lillian
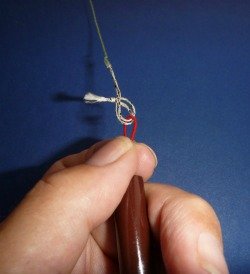 Hold lillian AND rod tip.
Pull line straight out.
Attaching the Tippet to the Line
This doesn't really fit with rod care, but it does fit with attaching the line to the rod and it is not nearly complex enough to require its own page.
As a rule of thumb, I would suggest about 3 1/2 feet of tippet, tied directly to the line. I have recently written about using a hand tied tapered leader between the line an the tippet. It is more complex (perhaps more complex than a beginner will want to undertake), and it is not done in Japan, but I do think it helps the fly turn over and can help keep the hi-vis line off the surface.
The following steps do not utilize the tapered leader.
 Figure 8 knot
Tie a figure 8 knot in the end of the line. Tighten it and clip the tag end.
Tie the tippet around the line. Use whatever knot you use to tie the tippet to the eye of a fly, as long as it isn't a loop knot, Palomar or Turle knot - Clinch, Improved Clinch, Uni, Orvis, Davy, they all work.
If you have a hard time grasping the concept of tying a tippet-to-fly knot around a line, bend the line into a small loop and pretend that loop is the eye of a fly.
Tie the knot, tighten it, then slide it down until it butts up against the figure 8 knot. It doesn't matter that the tippet comes off to the side. The fly is 3 1/2 feet away and tippet is very flexible. (Besides, fish don't have OCD. They don't care.)
Extending the Rod
Extend the rod one segment at a time, starting with the tip section and seating each segment until it is just slightly snug – not tight. When you pull each section out, pull it through your thumb and forefinger, which applies just a bit of friction. That's generally enough to seat the sections properly.
It is best not to do this under a tree with low branches and absolutely, positively, do not do it indoors in a room with a ceiling fan going. (I know that one from my own experience.)
Watch the rod tip as you extend the rod. If your line gets caught on something, the rod tip will get bent further and further as you extend the rod. If you don't notice it and keep extending, you could break the rod.
If you seat the sections too firmly, they could become stuck. If you do not seat the segments firmly enough, it is possible that the top section (or two, or three) can slide back down inside the rod. If that happens, DO NOT collapse the rod to retrieve them.
Collapsing the rod when the tip has fallen down inside can either jam the sections together or crack a section. Go sit down someplace and take off the grip cap. Slide the tip sections out the back (and collapse them if need be). Then collapse the rest of the rod, starting from the section just above the grip section. When the rod is fully collapsed, insert the tip sections into the rest of the rod. Next time, use just a bit more force to seat each section.
Collapsing the Rod
When collapsing the rod, start with the section just above the grip, and do one section at a time. To collapse the rod, place the rod butt against your waist and wrap the fingers of both hands around the end of the grip section. With your thumbs and forefingers, grip the next section just past where it extends from the butt section. PULL the section into the grip by bending your knuckles. Do not grab the section far away from the grip and try to push it into the grip. DON’T DO IT. The thinner sections, #2 and #3, will break easily if you try to push them in. Early in my tenkara career, I broke a rod that way, and I will bet that many, many rods get broken that way.
A lot of people ask me about buying extra tips, but more people break the #2 section. Collapse your rod this way and you'll never break it.
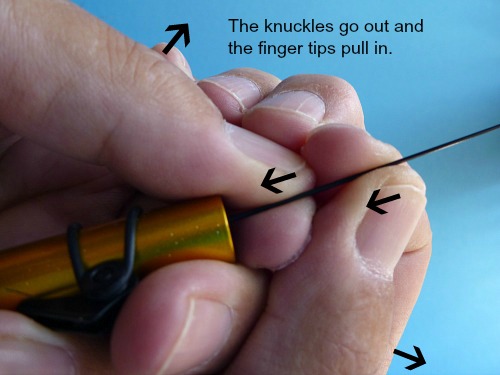
Please look at the illustration carefully. For each hand, the thumb pushes directly against the forefinger, with the rod section between them. The rod section is fully supported so there is no sideways pressure on it.
If your thumb and forefinger are offset, so each pushes against the rod section, but not against each other, the tip can snap easily.
After you collapse the rod, put the tip plug back in or the Fuji Rod Cap back on. This is especially true if you put the rod in your car to drive to a different spot. If the rod rolls around in the trunk or back seat the tip can slide out and get broken.
Freeing Stuck Sections
Tip Grip
If you get a stuck tip, Plan A is to use a Tip Grip. To use a Tip Grip, place the rod butt snug against your waist and wrap the last three fingers of your left hand around the front end of the butt section. With your thumb and first finger, wrap the Tip Grip around the stuck piece. The edge of the Tip Grip should be just touching the end of the butt section. Your thumb and first finger should be at about the middle of the Tip Grip. Squeeze tightly - but not so tightly that your squeeze bends the stuck section.
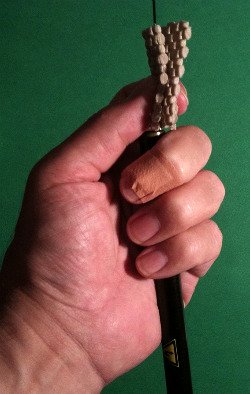 Fold Tip Grip around stuck section.
Wrap your right hand around the left, with your right thumb and forefinger
squeezing the Tip Grip and stuck section just above (and touching) your left
thumb and forefinger. Be absolutely certain that the grip of your two hands
does not bend the stuck section. If you bend it, you will break it.
To collapse the stuck section, just pull straight back towards your waist with both thumbs and forefingers. Because your grip on the stuck section is only about a half inch above the butt section, there is little chance of putting too much sideways pressure on the stuck section as long as you are very careful that your right thumb and forefinger and your left thumb and forefinger are in perfect alignment, and you carefully and consciously pull straight back.
Rubber Band Method
If the Tip Grip won’t free the stuck section, Plan B is to use a rubber band. Do this sitting down at a table. If you have to do it on the stream, do it sitting down on as large and flat a rock as you can find, and use something like your driver’s license/credit card, etc to provide a flat surface that will not chew up the ends of the sections. (DO NOT DO THIS MID STREAM OR SOMEWHERE YOU COULD LOSE YOUR DRIVERS LICENSE IF IT SLIPS!)
Unscrew the grip screw (and put it in a secure place. Remove all the sections that are about the same length, but keep them all together and all collapsed except for the stuck tip. (For some rods, all the sections are about the same length. For others they are graduated, with sections nearer the grip noticeably longer. For this method, you want the ones that are about the same length as the #2 section. At minimum, you must have the two sections that are stuck together and the next larger section.
Take a relatively thin rubber band and tie an overhand knot in it around the stuck tip no more than an inch above the top of the collapsed sections when the sections are held vertically, with their butts resting on the table. Pull the knot tight, but only by pulling on the two ends (loops) of the rubber band, making sure that you do not bend the tip section one way or the other. Do not use an old rubber band that is likely to break. Grip each loop of the rubber band near the tip section, so if it does break it won't snap the rod tip sideways.
Pull one end (loop) of the rubber band straight down and hold it against the side of the collapsed sections. It needs to be under tension but not strained to near breaking.
While holding the end of the rubber band tight against the collapsed
sections, with the sections vertical, butts resting on the table (or
driver’s license), pull up on the stuck section (the section it is stuck into
will come with it). Let go of the stuck section. The rubber band will snap it
down so that it hits the table. The larger sections are there to provide
lateral support and make sure the stuck sections don't bend and break. Pull the
stuck section up and let it snap down as often as it takes (you may have to
retighten or reposition the rubber band). The sharp jolt as the sections hit
the table should eventually free the stuck section. It may take over half an hour of constant snapping!
This method has a higher likelihood of working than using a Tip Grip, but the Tip Grip does not require taking the rod apart and finding a flat spot or risking breaking the tip as you tighten the rubber band. It is simpler and often works. Try it first.
If by chance the stuck section is #2 stuck in #3 but the tip isn't stuck, remove the tip to a safe place before using the rubber band to free the stuck section.
WD-40
I have had two reports of people who tried the rubber band method
without success, but then put a squirt of WD-40 on the joint, let it sit
for a few minutes, and then started the rubber band method again and
eventually freed the stuck section. I don't think WD-40 will damage the finish if it is washed off with a mild soap and warm water afterwards, but the urban legend that WD-40 is made from fish oil is not true. It is a petroleum distillate, and thus potentially could affect the rod's finish if it isn't washed off.
Dry the Rod Between Trips
When you are fishing, moisture will get inside the rod. Just lifting the rod and allowing the wet line to touch it will let water drip down to the next joint, and it will get inside the joint. If you let your rod tip dip down into the water as you are unhooking a fish or changing your tippet or fly, water will get inside. If you fish in the rain, lots of water will get inside.
After each trip completely disassemble the rod to let it dry thoroughly overnight. If it is really wet, dry each section with a tissue or paper towel.
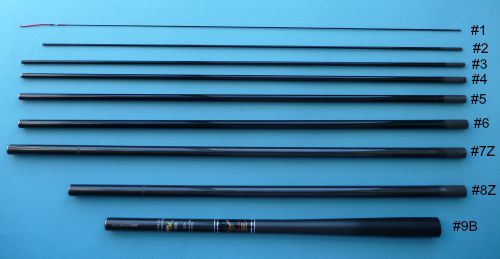 Disassemble the rod and lay it out to dry.
Lay the parts out so that the front ends (the end toward the rod tip) and the rear ends (the end towards the grip) are all aligned. The front ends usually have a painted band or ring to make it obvious, except for the second and possibly third sections. The rear end of each section will be unpainted and will be a dull gray.
Be sure to put them in a place where nothing heavy will get put on top of them, and where they are safe from children or cats (both of which are more curious than careful).
Reassemble the next morning.
When reassembling the rod, each part should slide in all the way with absolutely no resistance whatsoever. If you encounter any resistance STOP immediately. The part is probably in backwards.

If a part is in backwards, it could look like the photo above or it could look like the photo below.
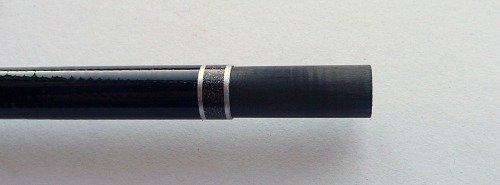
If you continue to push, it may jam the section permanently. If by chance you do get a section in backwards, and it becomes jammed, there is a method to free them that has been described to me but which I have not tried. It does make sense, though, and I believe it is the best chance to free them. Hat tip to Raymond R for passing it along.
Wrap several rubber bands tightly around one section, one on top of the other to form a hard mound of tightly wrapped rubber bands. Do the same on the other section. Put on a pair of rubber kitchen gloves, grasp both sections on the mounds of rubber bands and attempt to twist the sections in opposite directions while slightly pulling them apart. Most of the force should be twisting, not pulling, though. If at first it doesn't work, add more rubber bands. If it still doesn't work, add more rubber bands! Eventually, you should be able to get a firm enough grip on the two sections to free them. Still, better to not get them stuck in the first place!
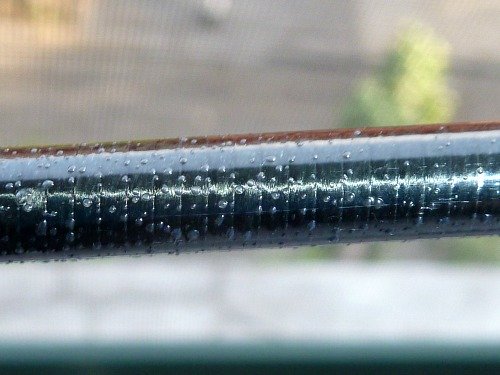 Bubbles in rod finish caused by putting it away wet.
If you put the rod away wet, it can ruin the finish. The photo above is of a premium Japanese rod that was put away wet. The bumps are not water droplets. They are bubbles in the finish.
Click here to read more about rod reassembly.
When Backpacking
Do not strap your rod to your backpack if you have left the line attached to the rod. Trees and bushes will reach out as you pass and grab the line. (Pesky trees.) With your next step, the line will pull the rod tip up and snap it off. You won't even feel any resistance. Using a Fuji rod cap will protect the rod tip, but could result in the whole rod being pulled up and off your pack. It is safest to disconnect the line and put the tip plug back in. It only takes a few moments to detach and re-attach the line, and it could save your rod tip and your fishing trip.
Jackets, Backpacks, etc.
I should also mention that if you collapse the rod and set it down or stick it in your belt so you can put on or take off a jacket, or get something out of a backpack, be absolutely sure to disconnect the line from the rod first.
It is easy to catch the line with one of your arms when putting on or taking off a jacket or fumbling with a backpack. I've never broken a tip putting on or taking off the line, but I've broken one tip putting on a rain jacket and one getting something out of my backpack.
When you are concentrating on the task at hand it is easy to forget what could go wrong with something else. Be safe and take the line off the rod first.
“The bitterness of poor quality remains long after the sweetness of low price is forgotten” - Benjamin Franklin
"Be sure in casting, that your fly fall first into the water, for if the line fall first, it scares or frightens the fish..." -
Col. Robert Venables 1662
As age slows my pace, I will become more like the heron.
Warning:
The hooks are sharp.
The coffee's hot.
The fish are slippery when wet.
Beware of the Dogma
If you enjoy spin fishing or baitcasting please visit my sister site Finesse-Fishing.com.


